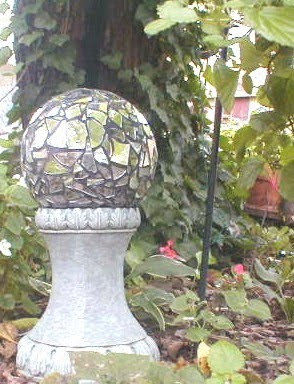
Bowling Ball………$1.00…………Garage Sale
Stand……………$2.00…………..Estate Sale
Broken mirror……………………FREE
Your backyard looking like a disco in the afternoon sun……….PRICELESS!Never spend a small fortune on gazing balls again. And this one is not likely to break because a squirrel jumps on it.
Ok, here ya go.
Supplies:
Bowling ball
Foam or a bowl to hold ball while working
Silicone ll sealant
SANDED Grout
Broken mirror
Buckets (one for grout mix and one for clean water)
Sponge
old towels
Rubber gloves
Place the bowling ball in a bowl, or what I do, is set it on a piece of waffled foam padding. This is to stabilize it so you can glue the mirror on it. I also fill the finger holes with liquid nails or silicone glue to even out the surface.
Break or cut the mirror pieces to be a tad smaller than 1 inch square. Smaller pieces are easier to glue on and will lay flatter on the round surface. I use an old towel. Wrap the mirror, and then whack it. The towel keeps the mirror from shattering all over the place.
Glass cutters work great on thin mirror but on really thick mirror you gonna have to break it with a hammer. (I got over the 7 years bad luck stuff a long time ago.)
Using clear silicone II sealant, start gluing the mirror to the ball. I do it like working a jig saw puzzle, trying to keep a minimum of a ¼ inch space between the pieces. Cover the entire ball, except where it is resting on the bowl or support. Let it dry for several hours (overnight works best). Then carefully rotate the ball to finish gluing the mirror. Let the glue dry for a day or two. This is dependent on weather. Temperature is a factor in the glue drying well.
Now it’s time to grout. I like the black (formal name is “charcoal”) color. BE SURE it is SANDED grout. And wear good rubber gloves. Messy stuff and it’ll dry your hands out. Put about 3 cups of the grout in an old bowl or bucket and add just enough water to get a peanut butter consistency. This is tricky so add your water a little at a time. If it seems too runny add a little more powdered grout. Once you get the thick but workable consistency, let the mixed grout sit for about 10 to 15 minutes. Then start smearing it on the ball, pushing it in the cracks. Have a bucket of clean water and a coarse sponge on hand, ready to go. Once you have covered the entire ball, then start wiping grout from the mirror. Each swipe requires a clean, well-rung-out sponge…so rinse often. When you have removed most of the grout from the mirrored pieces, let it sit for an hour or two. The grout will partially dry and you can buff the mirror with a clean rag or old towel.
And there ya go…. You have your very own disco gazing ball. Mirror is great because it reflects the colors of your garden and changes with the sunlight.
 I did another ball, using broken pieces of souvenirs from the Clinton Museum store. Here it is. They sold it to a private collector. I called it the “Blues Ball”. Can ya see the saxophone on it?
You can use marbles (the ones with a flat side) or broken china. The possibilities are endless. Have fun and show off those balls!


That's one snazzy gazing ball! I've seen gazing balls also serving as a centerpiece to garden spinner. See here in this site.
ReplyDeleteCan you tell me if your gazing ball held up to the weather elements? Did any pieces fall off? Also did any of the silvering on the back of the mirror pieces come off? I had read some adhesives can remove the silvering on the back of mirrors. and also possibly the outdoor elements like rain, heat etc could do that.I'd like to make one for a gift for my cousin, but would hate for it to not last very long. Fall apart, or turn ugly.
ReplyDeleteTook me time to read all the comments, but I really enjoyed the article. It proved to be Very helpful to me and I am sure to all the commenters here! It’s always nice when you can not only be informed, but also entertained! Clever Bowling
ReplyDelete